物种起源
最近在做新东西的时候,由于业务模式的问题,如有更新,发版本并不合适我们的场景,这就需要用到动态化的需求。当时就需要评估技术方案了
- 类似于BlackBox的虚拟化
- 造轮子
- 腾讯Shadow
处于快速,稳定性和轻量级原则,选择了腾讯的Shadow,毕竟也是大肠项目,非常可靠。
撸起 ** 开干
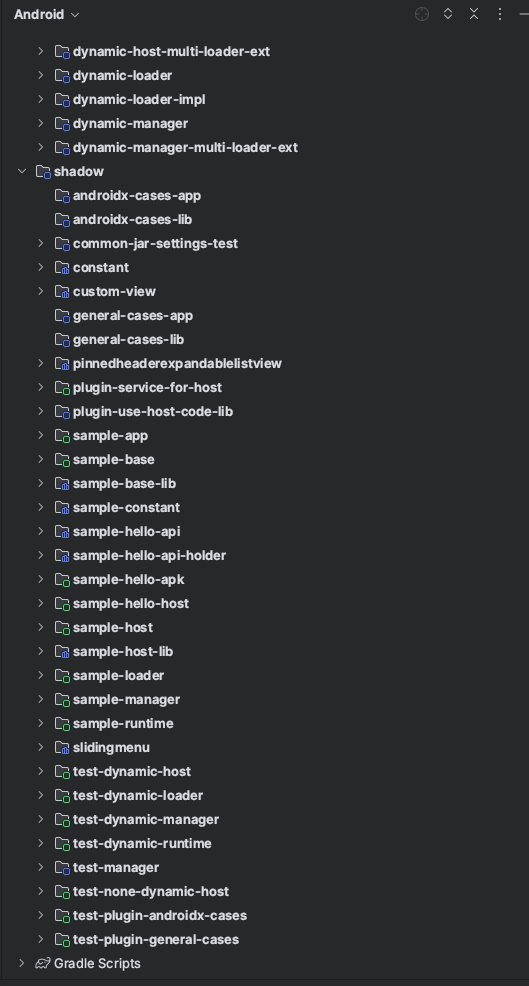
刚把项目拉下的时候,有点懵逼,离离原上谱啊家人们,这么多模块。

源码层及运行模式
经过一番摸索,其实整体的流程也是比较简单的,我感觉核心还是在gradle的plugin
运行模式
Shadow 支持两种运行模式,动态 与 非动态
先来说说动态模式,动态模式分为3个模块
- manager :主要负责模块的安装、管理、装载
- loader :主要负责加载Plugin,核心的加载逻辑
- runtime :主要负责提供插件的坑位,例如:PluginDefaultProxyActivity等。
这样做的好处就是全动态化,Shadow内核出现了什么bug或者需要支持什么,可以通过动态下发loader或者manager模块动态支持,安装到用户手机里的宿主不需要发版本更新。
再说说非动态模式
非动态模式几乎不需要模块,但是Shadow内核会打包在宿主内,如果需要更新内核,则需要更新APP,整体项目维护的复杂度降低。
两者一对比各有好坏,其实按照我个人的见解,其实一般情况下使用非动态模式就足够了。包括我后面做的时候都是使用非动态模式去做的。
原因:整个框架已经经过了腾讯的大量用户摩擦,其实并没有太多的需要自己兼容或者处理的东西,而且非动态会降低项目的维护成本,以及加载成功率。(有同行线上经过测试,非动态加载比动态加载的成功率会更高),其实也可以理解,因为动态本身就是一个不稳定的事情。
源码
以下不做喂饭分析,许多细节需要自己去扒,这里只梳理整个流程及原理。
首先先看一下动态的源码,关注以下几个模块
- sample-host
- sample-manager
- sample-loader
- sample-runtime
先关注怎么启动一个插件
sample-host#com.tencent.shadow.sample.host.PluginLoadActivity#startPlugin
HostApplication.getApp().loadPluginManager(PluginHelper.getInstance().pluginManagerFile);

Bundle bundle = new Bundle();
bundle.putString(Constant.KEY_PLUGIN_ZIP_PATH, PluginHelper.getInstance().pluginZipFile.getAbsolutePath());
bundle.putString(Constant.KEY_PLUGIN_PART_KEY, getIntent().getStringExtra(Constant.KEY_PLUGIN_PART_KEY));
bundle.putString(Constant.KEY_ACTIVITY_CLASSNAME, getIntent().getStringExtra(Constant.KEY_ACTIVITY_CLASSNAME));

HostApplication.getApp().getPluginManager()
        .enter(PluginLoadActivity.this, Constant.FROM_ID_START_ACTIVITY, bundle, new EnterCallback() {
            @Override
            public void onShowLoadingView(final View view) {
                mHandler.post(new Runnable() {
                    @Override
                    public void run() {
                        mViewGroup.addView(view);
                    }
                });
            }

            @Override
            public void onCloseLoadingView() {
                finish();
            }

            @Override
            public void onEnterComplete() {

            }
        });
其中loadPluginManager则是使用了Shadow官方提供的PluginManagerUpdater接口实现了FixedPathPmUpdater,使用固定路径加载manager。
DynamicPluginManager中则是反射加载manager中的实现类,这样就动态加载了manager。也就是sample-manager。DynamicPluginManager的源码就自己去翻阅了,实际上就是加载classloader然后反射,非常简单的一个。
    public void loadPluginManager(File apk) {
        if (mPluginManager == null) {
            mPluginManager = Shadow.getPluginManager(apk);
        }
    }


    public static PluginManager getPluginManager(File apk) {
        final FixedPathPmUpdater fixedPathPmUpdater = new FixedPathPmUpdater(apk);
        File tempPm = fixedPathPmUpdater.getLatest();
        if (tempPm != null) {
            return new DynamicPluginManager(fixedPathPmUpdater);
        }
        return null;
    }
回到startPlugin,后续调用了PluginManager中的enter。
HostApplication.getApp().getPluginManager()
        .enter(PluginLoadActivity.this, Constant.FROM_ID_START_ACTIVITY, bundle, new EnterCallback())
上面分析了,manager是由DynamicPluginManager反射创建的,所以最终来到是sample-manager#com.tencent.shadow.sample.manager.SamplePluginManager
    @Override
    public void enter(final Context context, long fromId, Bundle bundle, final EnterCallback callback) {
        if (fromId == Constant.FROM_ID_NOOP) {
            //do nothing.
        } else if (fromId == Constant.FROM_ID_START_ACTIVITY) {
            onStartActivity(context, bundle, callback);
        }
        ......省略
    }


 private void onStartActivity(final Context context, Bundle bundle, final EnterCallback callback) {
        final String pluginZipPath = bundle.getString(Constant.KEY_PLUGIN_ZIP_PATH);
        final String partKey = bundle.getString(Constant.KEY_PLUGIN_PART_KEY);
        final String className = bundle.getString(Constant.KEY_ACTIVITY_CLASSNAME);
        if (className == null) {
            throw new NullPointerException("className == null");
        }
        final Bundle extras = bundle.getBundle(Constant.KEY_EXTRAS);

        if (callback != null) {
            final View view = LayoutInflater.from(mCurrentContext).inflate(R.layout.activity_load_plugin, null);
            callback.onShowLoadingView(view);
        }

        executorService.execute(new Runnable() {
            @Override
            public void run() {
                try {
                    InstalledPlugin installedPlugin = installPlugin(pluginZipPath, null, true);

                    loadPlugin(installedPlugin.UUID, PART_KEY_PLUGIN_BASE);
                    loadPlugin(installedPlugin.UUID, PART_KEY_PLUGIN_MAIN_APP);
                    callApplicationOnCreate(PART_KEY_PLUGIN_BASE);
                    callApplicationOnCreate(PART_KEY_PLUGIN_MAIN_APP);

                    Intent pluginIntent = new Intent();
                    pluginIntent.setClassName(
                            context.getPackageName(),
                            className
                    );
                    if (extras != null) {
                        pluginIntent.replaceExtras(extras);
                    }
                    Intent intent = mPluginLoader.convertActivityIntent(pluginIntent);
                    intent.setFlags(Intent.FLAG_ACTIVITY_NEW_TASK);
                    mPluginLoader.startActivityInPluginProcess(intent);
                } catch (Exception e) {
                    throw new RuntimeException(e);
                }
                if (callback != null) {
                    callback.onCloseLoadingView();
                }
            }
        });
    }
到目前为止,我们的运行层面,还是在宿主的主进程,接下来就会开始进入插件的加载流程。
可以看到进入了installPlugin方法,这段代码啪啪啪搞这么长,就是用来解析并且加载由Shadow的Gradle Plugin,打包过后的插件包。
InstalledPlugin installedPlugin = installPlugin(pluginZipPath, null, true);


public InstalledPlugin installPlugin(String zip, String hash, boolean odex) throws IOException, JSONException, InterruptedException, ExecutionException {
        final PluginConfig pluginConfig = installPluginFromZip(new File(zip), hash);
        final String uuid = pluginConfig.UUID;
        List<Future> futures = new LinkedList<>();
        List<Future<Pair<String, String>>> extractSoFutures = new LinkedList<>();
        if (pluginConfig.runTime != null && pluginConfig.pluginLoader != null) {
            Future odexRuntime = mFixedPool.submit(new Callable() {
                @Override
                public Object call() throws Exception {
                    oDexPluginLoaderOrRunTime(uuid, InstalledType.TYPE_PLUGIN_RUNTIME,
                            pluginConfig.runTime.file);
                    return null;
                }
            });
            futures.add(odexRuntime);
            Future odexLoader = mFixedPool.submit(new Callable() {
                @Override
                public Object call() throws Exception {
                    oDexPluginLoaderOrRunTime(uuid, InstalledType.TYPE_PLUGIN_LOADER,
                            pluginConfig.pluginLoader.file);
                    return null;
                }
            });
            futures.add(odexLoader);
        }
        for (Map.Entry<String, PluginConfig.PluginFileInfo> plugin : pluginConfig.plugins.entrySet()) {
            final String partKey = plugin.getKey();
            final File apkFile = plugin.getValue().file;
            Future<Pair<String, String>> extractSo = mFixedPool.submit(() -> extractSo(uuid, partKey, apkFile));
            futures.add(extractSo);
            extractSoFutures.add(extractSo);
            if (odex) {
                Future odexPlugin = mFixedPool.submit(new Callable() {
                    @Override
                    public Object call() throws Exception {
                        oDexPlugin(uuid, partKey, apkFile);
                        return null;
                    }
                });
                futures.add(odexPlugin);
            }
        }

        for (Future future : futures) {
            future.get();
        }
        Map<String, String> soDirMap = new HashMap<>();
        for (Future<Pair<String, String>> future : extractSoFutures) {
            Pair<String, String> pair = future.get();
            soDirMap.put(pair.first, pair.second);
        }
        onInstallCompleted(pluginConfig, soDirMap);

        return getInstalledPlugins(1).get(0);
    }
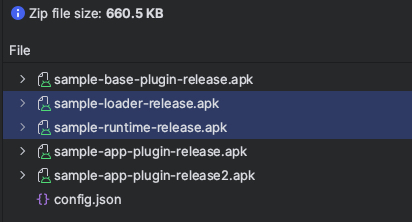
里面包含了runtime、loader,以及各个需要运行的插件,并且包含一份配置文件,如下图:
通过解析config.json,获取到所有的信息并且解析存入本地数据库。
继续分析
紧跟着loadPlugin,可以看到此处会先进行loadPluginLoaderAndRuntime,这里面做的事情就是绑定一个服务,getPluginProcessServiceName()方法返回的是:com.tencent.shadow.sample.host.PluginProcessPPS,从注册信息可以看出
loadPlugin(installedPlugin.UUID, PART_KEY_PLUGIN_BASE);
loadPlugin(installedPlugin.UUID, PART_KEY_PLUGIN_MAIN_APP);

protected void loadPlugin(String uuid, String partKey) throws RemoteException, TimeoutException, FailedException {
        loadPluginLoaderAndRuntime(uuid, partKey);
        Map map = mPluginLoader.getLoadedPlugin();
        if (!map.containsKey(partKey)) {
            mPluginLoader.loadPlugin(partKey);
        }
    }

    private void loadPluginLoaderAndRuntime(String uuid, String partKey) throws RemoteException, TimeoutException, FailedException {
        if (mPpsController == null) {
            bindPluginProcessService(getPluginProcessServiceName(partKey));
            waitServiceConnected(10, TimeUnit.SECONDS);
        }
        loadRunTime(uuid);
        loadPluginLoader(uuid);
    }
<service
android:name="com.tencent.shadow.sample.host.PluginProcessPPS"
android:process=":plugin" />
此处会进行启动一个PluginProcessPPS的服务,并且该服务运行的进程为:plugin,与宿主不是同一个进程
然后经过bindPluginProcessService,waitServiceConnected,进行启动与等待启动完成。
继续分析,等待启动完毕之后,会先后调用loadRunTime、loadPluginLoader两个方法。
此处就是一个ipc调用,实现是由PluginProcessPPS完成,由此可以看出,宿主通过启动PluginProcessPPS,并且通过ipc,让PluginProcessPPS,也就是plugin进程(非宿主进程),完成loadRunTime、loadPluginLoader
    loadRunTime(uuid);
    loadPluginLoader(uuid);

    public final void loadRunTime(String uuid) throws RemoteException, FailedException {
        if (mLogger.isInfoEnabled()) {
            mLogger.info("loadRunTime mPpsController:" + mPpsController);
        }
        PpsStatus ppsStatus = mPpsController.getPpsStatus();
        if (!ppsStatus.runtimeLoaded) {
            mPpsController.loadRuntime(uuid);
        }
    }

    public final void loadPluginLoader(String uuid) throws RemoteException, FailedException {
        if (mLogger.isInfoEnabled()) {
            mLogger.info("loadPluginLoader mPluginLoader:" + mPluginLoader);
        }
        if (mPluginLoader == null) {
            PpsStatus ppsStatus = mPpsController.getPpsStatus();
            if (!ppsStatus.loaderLoaded) {
                mPpsController.loadPluginLoader(uuid);
            }
            IBinder iBinder = mPpsController.getPluginLoader();
            mPluginLoader = new BinderPluginLoader(iBinder);
        }
    }
我们接下来看看PluginProcessPPS中做了些什么事,PluginProcessPPS并没有做些什么,而是继承了PluginProcessService,继续往下看
public class PluginProcessPPS extends PluginProcessService {
    public PluginProcessPPS() {
        LoadPluginCallback.setCallback(new LoadPluginCallback.Callback() {

            @Override
            public void beforeLoadPlugin(String partKey) {
                Log.d("PluginProcessPPS", "beforeLoadPlugin(" + partKey + ")");
            }

            @Override
            public void afterLoadPlugin(String partKey, ApplicationInfo applicationInfo, ClassLoader pluginClassLoader, Resources pluginResources) {
                Log.d("PluginProcessPPS", "afterLoadPlugin(" + partKey + "," + applicationInfo.className + "{metaData=" + applicationInfo.metaData + "}" + "," + pluginClassLoader + ")");
            }
        });
    }
}
先看下PluginProcessPPS中的loadRuntime,我将在代码中注释,这段稍微比较简单。
    void loadRuntime(String uuid) throws FailedException {
        checkUuidManagerNotNull();
        setUuid(uuid);
        if (mRuntimeLoaded) {
            throw new FailedException(ERROR_CODE_RELOAD_RUNTIME_EXCEPTION
                    , "重复调用loadRuntime");
        }
        try {
            if (mLogger.isInfoEnabled()) {
                mLogger.info("loadRuntime uuid:" + uuid);
            }
            // 此处getRuntime获取InstalledApk,此处实际就是获取runtime模块的安装信息(路径,基本信息),我们在上方installPlugin中已经全部解析好了,存入了本地数据库,此时只是单纯的get出来。
            InstalledApk installedApk;
            try {
                installedApk = mUuidManager.getRuntime(uuid);
            } catch (RemoteException e) {
                throw new FailedException(ERROR_CODE_UUID_MANAGER_DEAD_EXCEPTION, e.getMessage());
            } catch (NotFoundException e) {
                throw new FailedException(ERROR_CODE_FILE_NOT_FOUND_EXCEPTION, "uuid==" + uuid + "的Runtime没有找到。cause:" + e.getMessage());
            }

            // 这里重新转换了一下,其实是同一个东西
            InstalledApk installedRuntimeApk = new InstalledApk(installedApk.apkFilePath, installedApk.oDexPath, installedApk.libraryPath);
            // 下面这几个方法,则是将runtime的模块加载进当前进程,并且装载进classloader,这样在使用时就不会出现class not found
            boolean loaded = DynamicRuntime.loadRuntime(installedRuntimeApk);
            if (loaded) {
                DynamicRuntime.saveLastRuntimeInfo(this, installedRuntimeApk);
            }
            mRuntimeLoaded = true;
        } catch (RuntimeException e) {
            if (mLogger.isErrorEnabled()) {
                mLogger.error("loadRuntime发生RuntimeException", e);
            }
            throw new FailedException(e);
        }
    }
loadPluginLoader前半段是几乎与loadRuntime做的事情一致,变成了加载loader模块,此处最后不一样的是,使用LoaderImplLoader加载了loader模块。
void loadPluginLoader(String uuid) throws FailedException {
        if (mLogger.isInfoEnabled()) {
            mLogger.info("loadPluginLoader uuid:" + uuid + " mPluginLoader:" + mPluginLoader);
        }
        checkUuidManagerNotNull();
        setUuid(uuid);
        if (mPluginLoader != null) {
            throw new FailedException(ERROR_CODE_RELOAD_LOADER_EXCEPTION
                    , "重复调用loadPluginLoader");
        }
        try {
            InstalledApk installedApk;
            try {
                installedApk = mUuidManager.getPluginLoader(uuid);
                if (mLogger.isInfoEnabled()) {
                    mLogger.info("取出uuid==" + uuid + "的Loader apk:" + installedApk.apkFilePath);
                }
            } catch (RemoteException e) {
                if (mLogger.isErrorEnabled()) {
                    mLogger.error("获取Loader Apk失败", e);
                }
                throw new FailedException(ERROR_CODE_UUID_MANAGER_DEAD_EXCEPTION, e.getMessage());
            } catch (NotFoundException e) {
                throw new FailedException(ERROR_CODE_FILE_NOT_FOUND_EXCEPTION, "uuid==" + uuid + "的PluginLoader没有找到。cause:" + e.getMessage());
            }
            File file = new File(installedApk.apkFilePath);
            if (!file.exists()) {
                throw new FailedException(ERROR_CODE_FILE_NOT_FOUND_EXCEPTION, file.getAbsolutePath() + "文件不存在");
            }

            PluginLoaderImpl pluginLoader = new LoaderImplLoader().load(installedApk, uuid, getApplicationContext());
            pluginLoader.setUuidManager(mUuidManager);
            mPluginLoader = pluginLoader;
        } catch (RuntimeException e) {
            if (mLogger.isErrorEnabled()) {
                mLogger.error("loadPluginLoader发生RuntimeException", e);
            }
            throw new FailedException(e);
        } catch (FailedException e) {
            throw e;
        } catch (Exception e) {
            if (mLogger.isErrorEnabled()) {
                mLogger.error("loadPluginLoader发生Exception", e);
            }
            String msg = e.getCause() != null ? e.getCause().getMessage() : e.getMessage();
            throw new FailedException(ERROR_CODE_RUNTIME_EXCEPTION, "加载动态实现失败 cause:" + msg);
        }
    }
重点:
LoaderImplLoader是加载sample-loader的地方,通过load方法,同时在内部创建了一个binder,并且实现了以下几个方法
    void loadPlugin(String partKey) throws RemoteException;

    Map getLoadedPlugin() throws RemoteException;

    void callApplicationOnCreate(String partKey) throws RemoteException;

    Intent convertActivityIntent(Intent pluginActivityIntent) throws RemoteException;

    ComponentName startPluginService(Intent pluginServiceIntent) throws RemoteException;

    boolean stopPluginService(Intent pluginServiceIntent) throws RemoteException;

    boolean bindPluginService(Intent pluginServiceIntent, PluginServiceConnection connection, int flags) throws RemoteException;

    void unbindService(PluginServiceConnection conn) throws RemoteException;

    void startActivityInPluginProcess(Intent intent) throws RemoteException;
最终的实现是转给了mDynamicPluginLoader,也就是sample-loader,这里稍微有点绕,需要结合代码一起阅读会比较好。
com.tencent.shadow.dynamic.loader.impl.PluginLoaderBinder
@Throws(android.os.RemoteException::class)
    public override fun onTransact(
        code: Int,
        data: android.os.Parcel,
        reply: android.os.Parcel?,
        flags: Int
    ): Boolean {
        if (reply == null) {
            throw NullPointerException("reply == null")
        }
        when (code) {
            IBinder.INTERFACE_TRANSACTION -> {
                reply.writeString(PluginLoader.DESCRIPTOR)
                return true
            }
            PluginLoader.TRANSACTION_loadPlugin -> {
                data.enforceInterface(PluginLoader.DESCRIPTOR)
                val _arg0: String
                _arg0 = data.readString()!!
                try {
                    mDynamicPluginLoader.loadPlugin(_arg0)
                    reply.writeNoException()
                } catch (e: Exception) {
                    reply.writeException(wrapExceptionForBinder(e))
                }
                return true
            }
            PluginLoader.TRANSACTION_getLoadedPlugin -> {
                data.enforceInterface(PluginLoader.DESCRIPTOR)
                try {
                    val _result = mDynamicPluginLoader.getLoadedPlugin()
                    reply.writeNoException()
                    reply.writeMap(_result as Map<*, *>?)
                } catch (e: Exception) {
                    reply.writeException(wrapExceptionForBinder(e))
                }

                return true
            }
            PluginLoader.TRANSACTION_callApplicationOnCreate -> {
                data.enforceInterface(PluginLoader.DESCRIPTOR)
                val _arg0: String
                _arg0 = data.readString()!!
                try {
                    mDynamicPluginLoader.callApplicationOnCreate(_arg0)
                    reply.writeNoException()
                } catch (e: Exception) {
                    reply.writeException(wrapExceptionForBinder(e))
                }

                return true
            }
            PluginLoader.TRANSACTION_stopPluginService -> {
                data.enforceInterface(PluginLoader.DESCRIPTOR)
                val intent = if (0 != data.readInt()) {
                    Intent.CREATOR.createFromParcel(data)
                } else {
                    reply.writeException(NullPointerException("intent==null"))
                    return true
                }
                try {
                    val _result = mDynamicPluginLoader.stopPluginService(intent)
                    reply.writeNoException()
                    reply.writeInt(if (_result) 1 else 0)
                } catch (e: Exception) {
                    reply.writeException(wrapExceptionForBinder(e))
                }
                return true
            }
        }
        return super.onTransact(code, data, reply, flags)
    }
此时mPluginLoader,其实是 具有loader模块的binder版,此时先不关心内部实现,只要知道mPluginLoader能操纵loader模块即可。
注意,loadRuntime与loadPluginLoader都是在plugin进程,此时应该结束,要回到主进程了。
怕你们忘记了,还是回到这个流程上面来,我们已经经过了loadPluginLoaderAndRuntime方法,里面的loadRunTime、loadPluginLoader也均已完成,接下来就是通过mPluginLoader,获取已经加载的plugin,如果没有加载,则调用loadPlugin
loadPlugin(installedPlugin.UUID, PART_KEY_PLUGIN_BASE);
loadPlugin(installedPlugin.UUID, PART_KEY_PLUGIN_MAIN_APP);

protected void loadPlugin(String uuid, String partKey) throws RemoteException, TimeoutException, FailedException {
        loadPluginLoaderAndRuntime(uuid, partKey);
        Map map = mPluginLoader.getLoadedPlugin();
        if (!map.containsKey(partKey)) {
            mPluginLoader.loadPlugin(partKey);
        }
    }

    private void loadPluginLoaderAndRuntime(String uuid, String partKey) throws RemoteException, TimeoutException, FailedException {
        if (mPpsController == null) {
            bindPluginProcessService(getPluginProcessServiceName(partKey));
            waitServiceConnected(10, TimeUnit.SECONDS);
        }
        loadRunTime(uuid);
        loadPluginLoader(uuid);
    }
此处是不是疑惑mPluginLoader从哪里来?
上面经过分析调用PluginProcessService中的loadPluginLoader之后,会通过LoaderImplLoader创建loader,并且封装成一个binder,此处getPluginLoader就是获取的plugin进程中 具有loader模块的binder版
    public final void loadPluginLoader(String uuid) throws RemoteException, FailedException {
        if (mLogger.isInfoEnabled()) {
            mLogger.info("loadPluginLoader mPluginLoader:" + mPluginLoader);
        }
        if (mPluginLoader == null) {
            PpsStatus ppsStatus = mPpsController.getPpsStatus();
            if (!ppsStatus.loaderLoaded) {
                mPpsController.loadPluginLoader(uuid);
            }
            // 重点
            IBinder iBinder = mPpsController.getPluginLoader();
            mPluginLoader = new BinderPluginLoader(iBinder);
        }
    }
如果读到此处感到吃力,不能理解。那么说明基础不够,建议翻回去继续看源码反复阅读分析。不多赘述。
此时,像上面分析所说,获取已经加载的plugin,如果没有加载,则调用loadPlugin。
那么问题来了,loadPlugin会去到哪里呢?哪个进程?哪个代码?
如果不能说出来,建议翻回去继续看源码反复阅读分析。其实比较核心的还是进程之间的关系与调用。
此时loadPlugin会调用:plugin进程中已经加载的loader模块中的loadPlugin,此处是主进程,所以是通过ipc调用,查看binder的实现端
重点重点,请注意,此时又来到了plugin进程
com.tencent.shadow.dynamic.loader.impl.PluginLoaderBinder
@Throws(android.os.RemoteException::class)
    public override fun onTransact(
        code: Int,
        data: android.os.Parcel,
        reply: android.os.Parcel?,
        flags: Int
    ): Boolean {
        if (reply == null) {
            throw NullPointerException("reply == null")
        }
        when (code) {
            IBinder.INTERFACE_TRANSACTION -> {
                reply.writeString(PluginLoader.DESCRIPTOR)
                return true
            }
            PluginLoader.TRANSACTION_loadPlugin -> {
                data.enforceInterface(PluginLoader.DESCRIPTOR)
                val _arg0: String
                _arg0 = data.readString()!!
                try {
                    mDynamicPluginLoader.loadPlugin(_arg0)
                    reply.writeNoException()
                } catch (e: Exception) {
                    reply.writeException(wrapExceptionForBinder(e))
                }
                return true
            }
        }
        return super.onTransact(code, data, reply, flags)
    }
mDynamicPluginLoader实际上就是对sample-loader中的类稍微包装后的类,所以也就调用到了sample-loader中的loadPlugin
sample-loader#com.tencent.shadow.sample.plugin.loader.SamplePluginLoader#loadPlugin
@Override
    public Future<?> loadPlugin(final InstalledApk installedApk) throws LoadPluginException {
        LoadParameters loadParameters = getLoadParameters(installedApk);
        final String partKey = loadParameters.partKey;

        LoadPluginCallback.getCallback().beforeLoadPlugin(partKey);

        final Future<?> future = super.loadPlugin(installedApk);

        getMExecutorService().submit(new Runnable() {
            @Override
            public void run() {
                try {
                    future.get();
                    PluginParts pluginParts = getPluginParts(partKey);
                    String packageName = pluginParts.getApplication().getPackageName();
                    ApplicationInfo applicationInfo = pluginParts.getPluginPackageManager().getApplicationInfo(packageName, GET_META_DATA);
                    PluginClassLoader classLoader = pluginParts.getClassLoader();
                    Resources resources = pluginParts.getResources();

                    LoadPluginCallback.getCallback().afterLoadPlugin(partKey, applicationInfo, classLoader, resources);
                } catch (Exception e) {
                    throw new RuntimeException(e);
                }
            }
        });

        return future;
    }
此处其实复写了父类的loadPlugin,此处什么也没做,只是做一些事后的操作,关键还是super.loadPlugin(installedApk)这句代码
SamplePluginLoader继承了ShadowPluginLoader,所以是由ShadowPluginLoader完成了loadPlugin
    @Throws(LoadPluginException::class)
    open fun loadPlugin(
        installedApk: InstalledApk
    ): Future<*> {
        val loadParameters = installedApk.getLoadParameters()
        if (mLogger.isInfoEnabled) {
            mLogger.info("start loadPlugin")
        }
        // 在这里初始化PluginServiceManager
        mPluginServiceManagerLock.withLock {
            if (!::mPluginServiceManager.isInitialized) {
                mPluginServiceManager = PluginServiceManager(this, mHostAppContext)
            }

            mComponentManager.setPluginServiceManager(mPluginServiceManager)
        }

        return LoadPluginBloc.loadPlugin(
            mExecutorService,
            mComponentManager,
            mLock,
            mPluginPartsMap,
            mHostAppContext,
            installedApk,
            loadParameters
        )
    }
LoadPluginBloc这里面才是loadPlugin的核心逻辑
object LoadPluginBloc {
    @Throws(LoadPluginException::class)
    fun loadPlugin(
        executorService: ExecutorService,
        componentManager: ComponentManager,
        lock: ReentrantLock,
        pluginPartsMap: MutableMap<String, PluginParts>,
        hostAppContext: Context,
        installedApk: InstalledApk,
        loadParameters: LoadParameters
    ): Future<*> {
        if (installedApk.apkFilePath == null) {
            throw LoadPluginException("apkFilePath==null")
        } else {
            // 此处创建插件的classloader
            val buildClassLoader = executorService.submit(Callable {
                lock.withLock {
                    LoadApkBloc.loadPlugin(installedApk, loadParameters, pluginPartsMap)
                }
            })

            // 解析插件的四大组件信息
            val buildPluginManifest = executorService.submit(Callable {
                val pluginClassLoader = buildClassLoader.get()
                val pluginManifest = pluginClassLoader.loadPluginManifest()
                CheckPackageNameBloc.check(pluginManifest, hostAppContext)
                pluginManifest
            })

            // 构建插件的ApplicationInfo,运行时需要用到
            val buildPluginApplicationInfo = executorService.submit(Callable {
                val pluginManifest = buildPluginManifest.get()
                val pluginApplicationInfo = CreatePluginApplicationInfoBloc.create(
                    installedApk,
                    loadParameters,
                    pluginManifest,
                    hostAppContext
                )
                pluginApplicationInfo
            })

            // 构建插件的PackageManager
            val buildPackageManager = executorService.submit(Callable {
                val pluginApplicationInfo = buildPluginApplicationInfo.get()
                val hostPackageManager = hostAppContext.packageManager
                PluginPackageManagerImpl(
                    pluginApplicationInfo,
                    installedApk.apkFilePath,
                    componentManager,
                    hostPackageManager,
                )
            })

            // 构建插件的Resources
            val buildResources = executorService.submit(Callable {
                CreateResourceBloc.create(installedApk.apkFilePath, hostAppContext)
            })

            // 构建AppComponentFactory
            val buildAppComponentFactory = executorService.submit(Callable {
                val pluginClassLoader = buildClassLoader.get()
                val pluginManifest = buildPluginManifest.get()
                val appComponentFactory = pluginManifest.appComponentFactory
                if (appComponentFactory != null) {
                    val clazz = pluginClassLoader.loadClass(appComponentFactory)
                    ShadowAppComponentFactory::class.java.cast(clazz.newInstance())
                } else ShadowAppComponentFactory()
            })

            // 构建插件的application
            val buildApplication = executorService.submit(Callable {
                val pluginClassLoader = buildClassLoader.get()
                val resources = buildResources.get()
                val appComponentFactory = buildAppComponentFactory.get()
                val pluginManifest = buildPluginManifest.get()
                val pluginApplicationInfo = buildPluginApplicationInfo.get()

                CreateApplicationBloc.createShadowApplication(
                    pluginClassLoader,
                    loadParameters,
                    pluginManifest,
                    resources,
                    hostAppContext,
                    componentManager,
                    pluginApplicationInfo,
                    appComponentFactory
                )
            })

            // 这个是任务的总流程,会使用上面的所有构建,完成一个插件运行时所需要的东西
            val buildRunningPlugin = executorService.submit {
                if (File(installedApk.apkFilePath).exists().not()) {
                    throw LoadPluginException("插件文件不存在.pluginFile==" + installedApk.apkFilePath)
                }
                val pluginPackageManager = buildPackageManager.get()
                val pluginClassLoader = buildClassLoader.get()
                val resources = buildResources.get()
                val shadowApplication = buildApplication.get()
                val appComponentFactory = buildAppComponentFactory.get()
                val pluginManifest = buildPluginManifest.get()
                lock.withLock {
                    componentManager.addPluginApkInfo(
                        pluginManifest,
                        loadParameters,
                        installedApk.apkFilePath,
                    )
                    pluginPartsMap[loadParameters.partKey] = PluginParts(
                        appComponentFactory,
                        shadowApplication,
                        pluginClassLoader,
                        resources,
                        pluginPackageManager
                    )
                    PluginPartInfoManager.addPluginInfo(
                        pluginClassLoader, PluginPartInfo(
                            shadowApplication, resources,
                            pluginClassLoader, pluginPackageManager
                        )
                    )
                }
            }

            return buildRunningPlugin
        }
    }
}
现在loadPlugin流程已走完,以上操作时在plugin进程完成。
此时回到宿主进程
sample-manager#com.tencent.shadow.sample.manager.SamplePluginManager#onStartActivity
loadPlugin结束后,需要callApplicationOnCreate。
InstalledPlugin installedPlugin = installPlugin(pluginZipPath, null, true);

loadPlugin(installedPlugin.UUID, PART_KEY_PLUGIN_BASE);
loadPlugin(installedPlugin.UUID, PART_KEY_PLUGIN_MAIN_APP);

callApplicationOnCreate(PART_KEY_PLUGIN_BASE);
callApplicationOnCreate(PART_KEY_PLUGIN_MAIN_APP);

.......

protected void callApplicationOnCreate(String partKey) throws RemoteException {
        Map map = mPluginLoader.getLoadedPlugin();
        Boolean isCall = (Boolean) map.get(partKey);
        if (isCall == null || !isCall) {
            mPluginLoader.callApplicationOnCreate(partKey);
        }
}
又通过mPluginLoader转到plugin进程,调用sample-loader中SamplePluginManager的callApplicationOnCreate
此处就一目了然,获取已经构建好的application,进行attachBaseContext,同时初始化contentProvider,再进行application的onCreate,完成application的初始化。
ShadowPluginLoader
    fun callApplicationOnCreate(partKey: String) {
        fun realAction() {
            val pluginParts = getPluginParts(partKey)
            pluginParts?.let {
                val application = pluginParts.application
                application.attachBaseContext(mHostAppContext)
                mPluginContentProviderManager.createContentProviderAndCallOnCreate(
                    application, partKey, pluginParts
                )
                application.onCreate()
            }
        }
        if (isUiThread()) {
            realAction()
        } else {
            val waitUiLock = CountDownLatch(1)
            mUiHandler.post {
                realAction()
                waitUiLock.countDown()
            }
            waitUiLock.await();
        }
    }
剩下的启动流程就比较简单了,构建好插件的Intent,通过convertActivityIntent将插件的Activity,转换为runtime内的PluginDefaultProxyActivity,然后通过mPluginLoader转到plugin进程,进行startActivity。
由于runtime已经装载进classloader,所以不会出现class not found的情况。
// 构建好插件的Intent
Intent pluginIntent = new Intent();
pluginIntent.setClassName(
        context.getPackageName(),
        className
);
if (extras != null) {
    pluginIntent.replaceExtras(extras);
}
// 将插件的Activity转换为runtime内的PluginDefaultProxyActivity
Intent intent = mPluginLoader.convertActivityIntent(pluginIntent);
intent.setFlags(Intent.FLAG_ACTIVITY_NEW_TASK);
// 转到plugin进程,进行startActivity
mPluginLoader.startActivityInPluginProcess(intent);
总结
以上就是shadow的动态模式启动流程,但是这仅仅是Shadow的启动流程,activity是如何正常运作的,其余组件是如何运作的,都是可以去继续深入研究的。
BlackShadow
接入shadow需要大量的二次开发工作,其实一般小型项目其实并不想关心太多的逻辑和管理,只想开袋即食,奈何Shadow也并没有提供这方面的能力,所有开发者接入都需要二次开发才可以使用,所以花了点时间在Shadow的基础上包装了一层,几乎不需要任何二次开发,即可通过几个简单的接口使用与管理Shadow,屏蔽了Shadow所有的技术细节。
相关
博客文章:
腾讯Shadow浅析及应用及BlackShadow
Tencent Shadow:
https://github.com/Tencent/Shadow
基于Shadow的技术方案
BlackShadow使用的是非动态方案,支持同时最多10个插件运行,分别都是各自单独的进程。install与launch都有boolean返回值,可反馈出插件是否安装/启动成功。
未实现
- Activity栈的管理,目前统一打开standard Activity
- 多个插件共用一个进程
如何使用?
建议直接clone本项目查看项目结构。
1. clone Shadow
nnjun仓库与Tencent仓库没有技术性差异。
git clone https://github.com/Tencent/Shadow.git
或者
git clone https://github.com/nnjun/Shadow.git (建议使用这个)
2. 编译本地仓库
拉下仓库后,进入Shadow目录,将Shadow发布到本地maven仓库
./gradlew publish3. 修改项目Shadow版本
修改Shadow版本为本地的版本,如果是拉取nnjun仓库则不需要改
https://github.com/CodingGay/BlackShadow/blob/main/build.gradle#L3
BlackShadow使用方法
在Application#attachBaseContext中初始化
    @Override
    protected void attachBaseContext(Context base) {
        super.attachBaseContext(base);
        BlackShadow.get().init(this);
    }
安装与启动
    InstallResult installResult = BlackShadow.get().installPlugin("plugin-key", new File(pluginAPk));
    if (installResult.isSuccess()) {
        Intent intent = new Intent();
        intent.xxxxxxxxxxxxx
        BlackShadow.get().launchPlugin("plugin-key", intent);
    }
其余接口
    // 仅启动application
    public boolean callApplication(String pluginKey)

    // 获取所有已安装的plugin
    public List<InstalledPlugin> getInstalledPlugins()

    // 获取某个已安装的plugin
    public InstalledPlugin getInstalledPlugin(String pluginKey);

    // 卸载某个plugin
    public void uninstallPlugin(String pluginKey)

    // 停止某个plugin
    public void stopPlugin(String pluginKey)

    // 停止所有plugin
    public void stopAllPlugin()

    // 获取正在运行的plugin
    public List<RunningPlugin> getRunningPlugins()
插件包名与宿主包名不相同的需求
由于Shadow内核要求,plugin与宿主的包名必须一致,否则会出现问题,然而我方产品可能会存在不同的渠道包不同的包名,但是插件没有必要分开很多份,所以BlackShadow是支持插件与宿主不同的包名,处理的方法是在install时如果不一样,BlackShaodw会自动将插件的包名改成与宿主相同,不需要额外开发,直接进行install即可,BlackShadow会自动处理该问题。
假如你也有这个需求,则需要自行修改Shaodw内核,或者直接使用nnjun仓库
https://github.com/nnjun/Shadow/commit/32636d2759bae1d1f241c8f43ffb769ff2ce5ef5
不是修改了包名了吗?为什么还需要修改内核?
因为Shadow的包名基准是由Shadow编译时生成的com.tencent.shadow.core.manifest_parser.PluginManifest文件来确定,BlackShadow只会修改Manifest中的包名,并不会修改PluginManifest.class内的硬编码包名,所以需要修改编译插件,否则无法运行。
如果你没有以上的场景,那么请无视上面这一段内容,直接使用即可。
博主太厉害了!
第一第一